Chewy Red Velvet Oreo Cookies: Your Ultimate One-Bowl Recipe for Sweet Indulgence
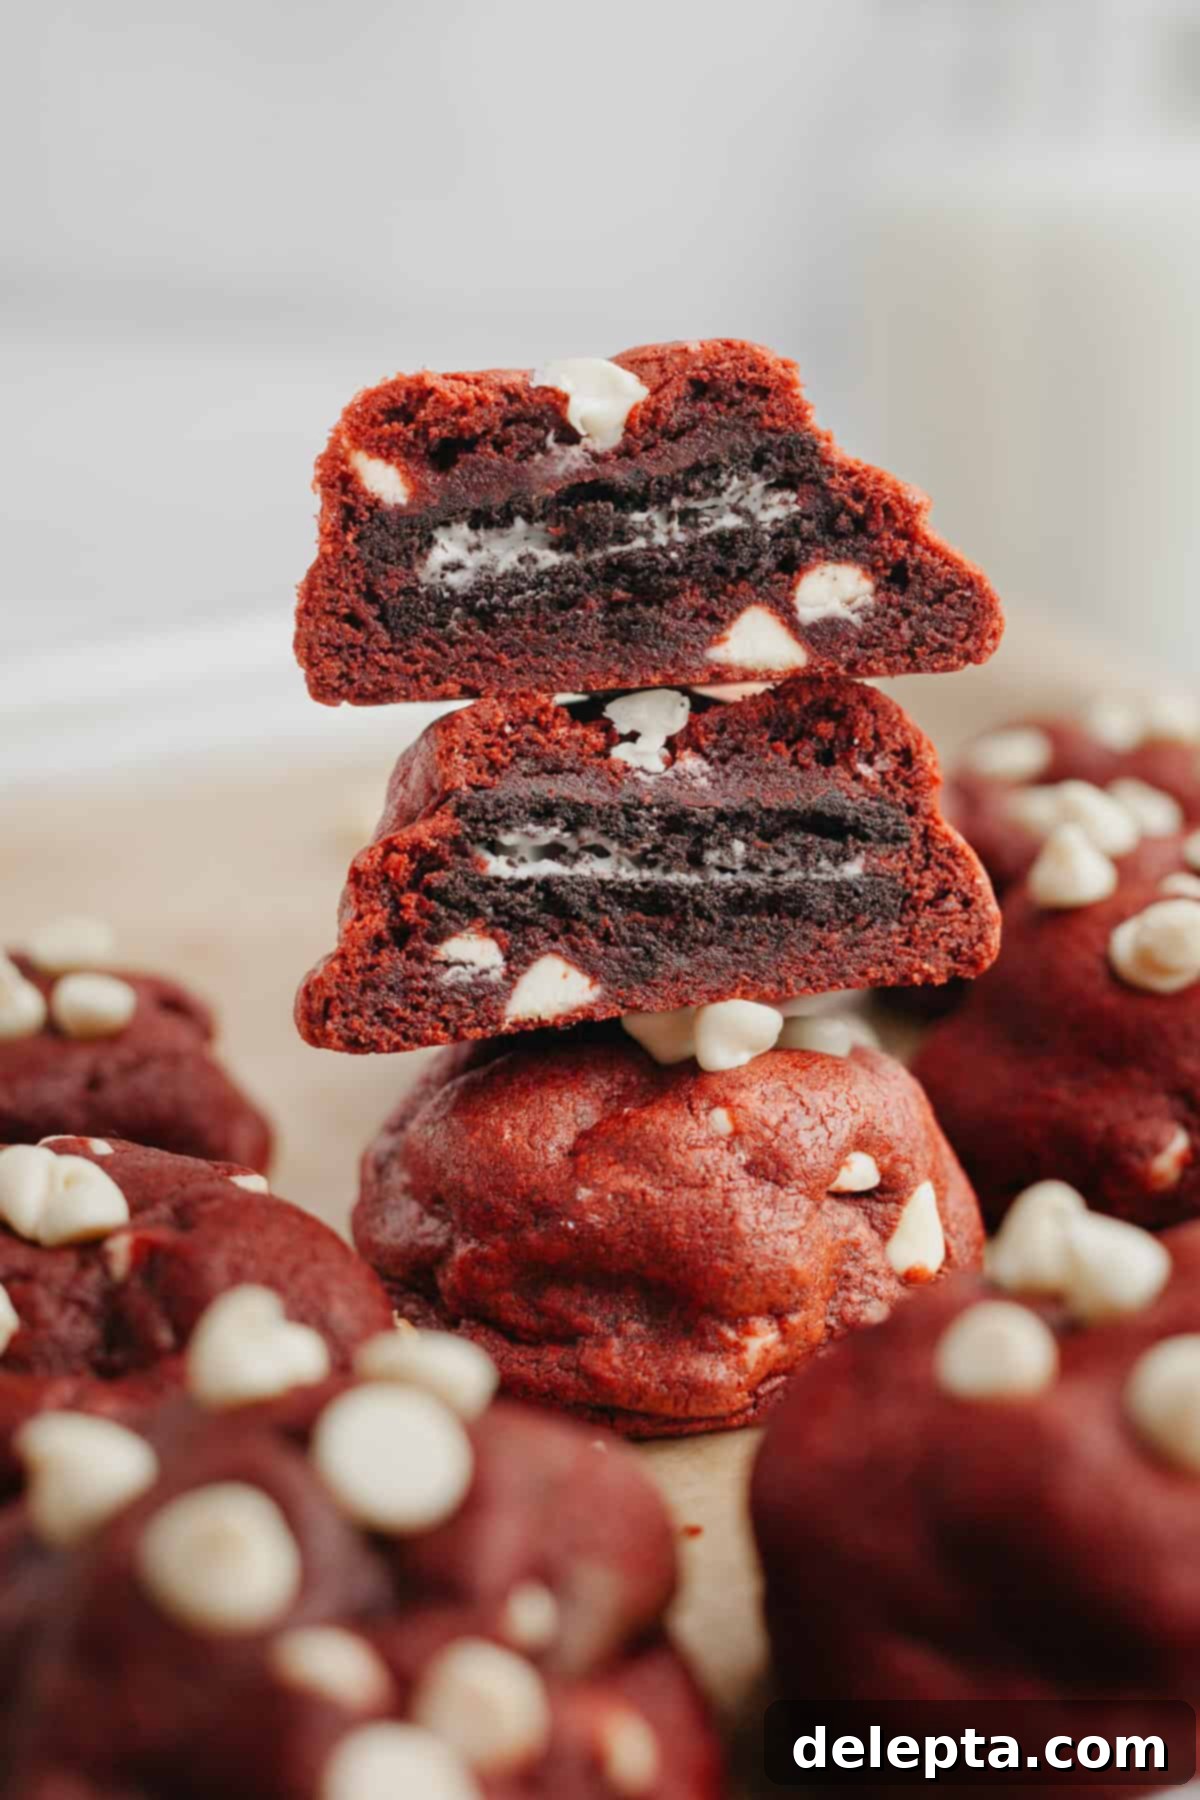
Get ready for the dreamiest cookie combo yet – magnificent red velvet Oreo cookies! These show-stopping red velvet cookies are generously loaded with premium white chocolate chips and delightfully stuffed with an entire Oreo. The best part? They’re incredibly simple to make, requiring just one bowl from start to finish!

There is truly nothing better than biting into a freshly baked, gooey cookie, still warm and wonderfully soft from the oven. These red velvet cookies capture that perfect experience and elevate it with an irresistible twist. Crafted in just one bowl, they promise an extra soft and delightfully chewy texture – absolutely no dry cookies allowed here! The vibrant red hue and rich cocoa flavor of these cookies make them a standout dessert.
While these cookies are undeniably fun to bake and share around special occasions like Valentine’s Day or Christmas, their deliciousness knows no seasonal bounds. We adore them all year round! For an extra festive touch, consider switching up the Oreo flavor inside to perfectly coordinate with any holiday or theme you’re celebrating. Imagine golden Oreos for Easter, mint Oreos for St. Patrick’s Day, or even pumpkin spice Oreos for autumn – the possibilities are endless for these versatile stuffed red velvet cookies.
[feast_advanced_jump_to]
Why You’ll Fall in Love with These Red Velvet Oreo Cookies!
- **Effortless One-Bowl Baking:** Our Red Velvet Oreo Cookies are designed for ultimate convenience, requiring only a single bowl for mixing the dough. This means significantly less cleanup for you, allowing you to spend more time savoring your decadent homemade treats rather than scrubbing dishes. Whether you prefer a handheld mixer or a stand mixer, the process is streamlined and stress-free.
- **Quick & Easy Preparation:** You’ll be amazed at how quickly these cookies come together. The active prep time is a mere 10 minutes, making them perfect for those moments when a cookie craving strikes or you need a last-minute dessert. Do keep in mind, however, that a brief chilling period in the fridge is essential before baking to ensure optimal texture and prevent excessive spreading. This short chill time is crucial for bakery-worthy results.
- **Simple, Accessible Ingredients:** Forget searching for obscure items! You only need 12 common ingredients, most of which you likely already have stocked in your pantry and refrigerator. This makes these stuffed red velvet cookies an accessible and budget-friendly baking project for any home cook.
- **Customizable White Chocolate Goodness:** These gooey red velvet cookies are generously packed with creamy white chocolate chips, adding a lovely contrast to the cocoa flavor. However, feel free to unleash your creativity! You can easily swap them out for dark chocolate chips for a richer flavor, classic milk chocolate chips, or even incorporate more crushed Oreo pieces directly into the dough for an extra layer of cookie-on-cookie delight.
- **The Ultimate Stuffed Cookie Experience:** Each and every cookie is meticulously stuffed with a whole Oreo, creating a delightful surprise in every bite. This unique feature transforms a simple red velvet cookie into the perfect red velvet Oreo cookie – a truly indulgent treat that combines two beloved desserts into one unforgettable experience.
- **Bakery-Worthy Results Guaranteed:** We’ve compiled a collection of invaluable tips and tricks to help you achieve cookies that look and taste like they came straight from a gourmet bakery. From proper measuring techniques to achieving that perfect round shape, we’ll guide you through every step to ensure your Red Velvet Oreo Cookies are nothing short of spectacular.
Essential Ingredients for Your Red Velvet Oreo Cookies
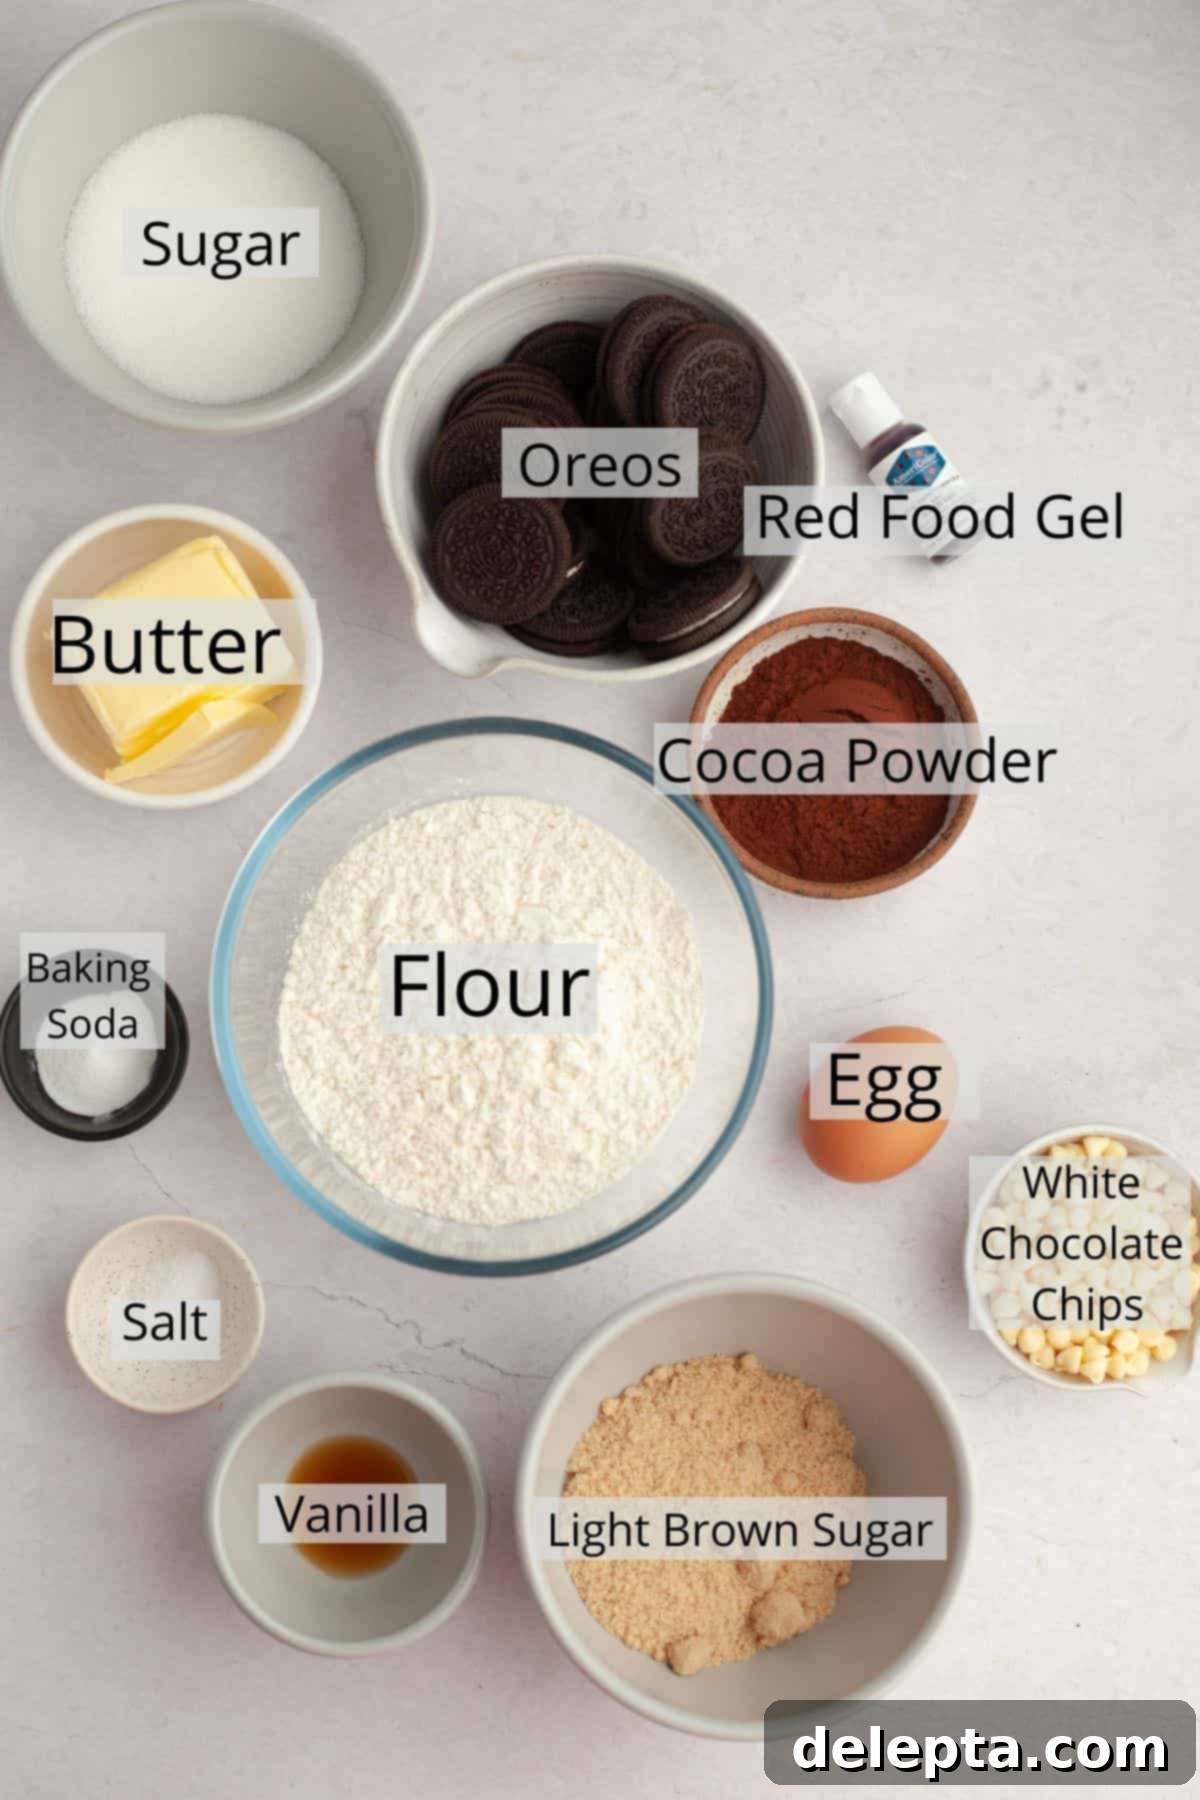
- All-Purpose Flour: For these incredible cookies, we’ve specifically tested and perfected the recipe using standard all-purpose flour. Its balanced protein content provides the ideal structure and tenderness. If you require a gluten-free option, we highly recommend using a 1-to-1 gluten-free all-purpose baking flour blend, which is typically formulated to behave similarly to regular flour. Please ensure it contains xanthan gum for best results.
- Natural Unsweetened Cocoa Powder: This ingredient is crucial for that classic red velvet flavor. It’s vital to use natural or unsweetened cocoa powder, *not* Dutch-processed cocoa powder. Natural cocoa is acidic and reacts beautifully with the baking soda in the recipe, creating the necessary lift and soft texture. Dutch-processed cocoa, on the other hand, has been neutralized with an alkali and will not react properly, leading to flatter, denser cookies. Unsure which one you have? Simply check the ingredients label! If it mentions “alkali” or “acidity regulators,” it’s Dutch-processed.
- White Chocolate Chips: While white chocolate chips provide a delightful creamy sweetness that complements the rich red velvet perfectly, they are also wonderfully versatile. Feel free to customize! You can easily swap them for dark chocolate chips for a more intense cocoa experience, classic milk chocolate chips, or even add more crushed Oreo pieces directly into the dough for an extra burst of Oreo flavor and texture throughout the cookie.
- Oreos: The star of our stuffed cookies! We typically use classic regular Oreos for this recipe, which offer that familiar crunch and creaminess. However, don’t be afraid to experiment with the vast array of Oreo flavors available. Seasonal varieties like Red Velvet Oreos (for an extra red velvet punch!), Birthday Cake Oreos, Peanut Butter Oreos, or even Double Stuffed Oreos can add an exciting new dimension. Golden Oreos are also a fantastic choice if you want to switch up the color contrast inside the cookie. The choice is yours to make these cookies truly unique!
- Red Food Gel: Achieving that iconic vibrant red color is key for red velvet cookies. Our absolute favorite food gel brand for consistent, brilliant color is Americolor. For these specific cookies, we used their Super Red shade, which delivers a deep, rich red. We’ve also successfully tested this recipe with Maroon for a slightly darker, more sophisticated red, and Tulip Red for a brighter, more playful hue. Remember that different brands and shades will vary in intensity, so start with a small amount and gradually add more until you achieve your desired vibrant color.
Easy Step-by-Step Instructions for Perfect Red Velvet Oreo Cookies
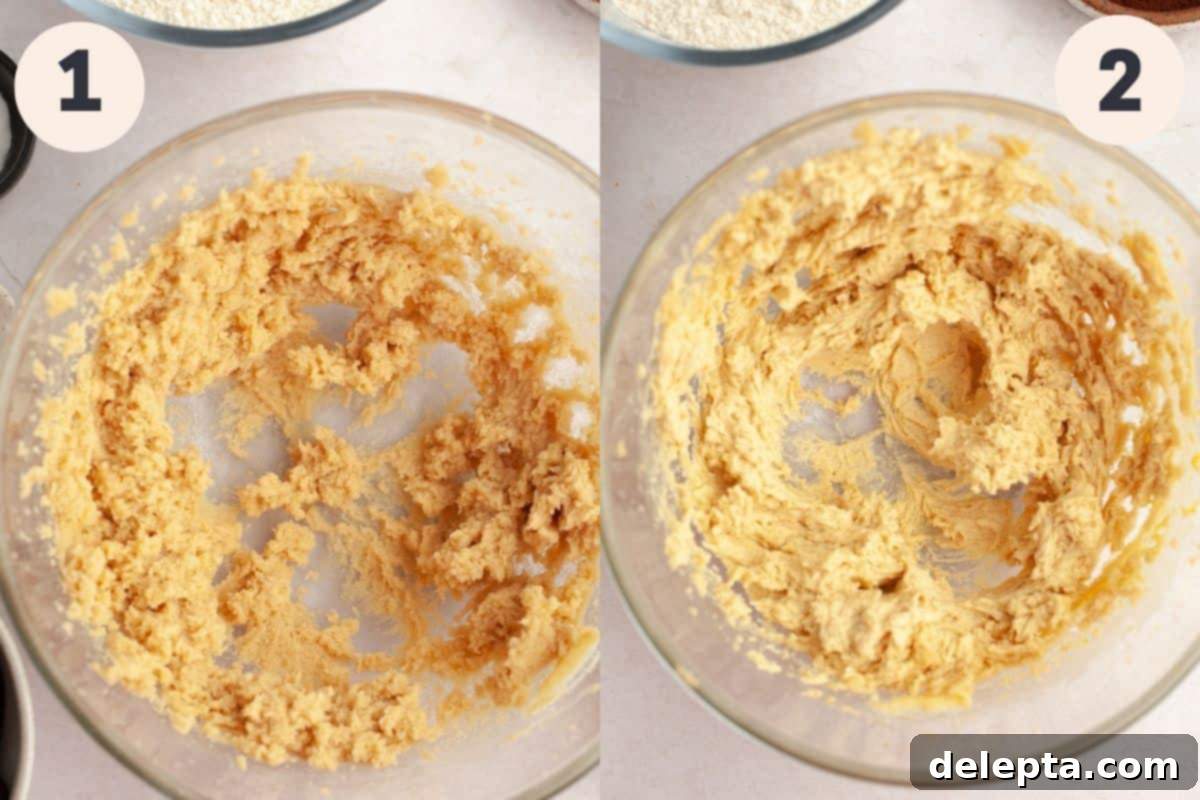
Step 1: Cream the Butter and Sugars. In a large mixing bowl, using either a handheld mixer or a stand mixer fitted with the paddle attachment, combine your softened, room-temperature unsalted butter with both the white granulated sugar and the light brown sugar. Beat these ingredients together on medium-high speed for 2-3 minutes. Continue mixing until the mixture becomes visibly light, fluffy, and pale in color. This creaming process incorporates air into the butter and sugar, which is crucial for achieving that wonderfully soft and tender cookie texture.
Step 2: Incorporate Wet Ingredients. After creaming, make sure to scrape down the sides of the bowl with a spatula to ensure all ingredients are evenly incorporated. Then, add in the large egg and the vanilla extract. Resume beating on medium-high speed for another minute. The mixture should become smooth and slightly more emulsified. This step ensures that the flavors are well distributed throughout the dough.
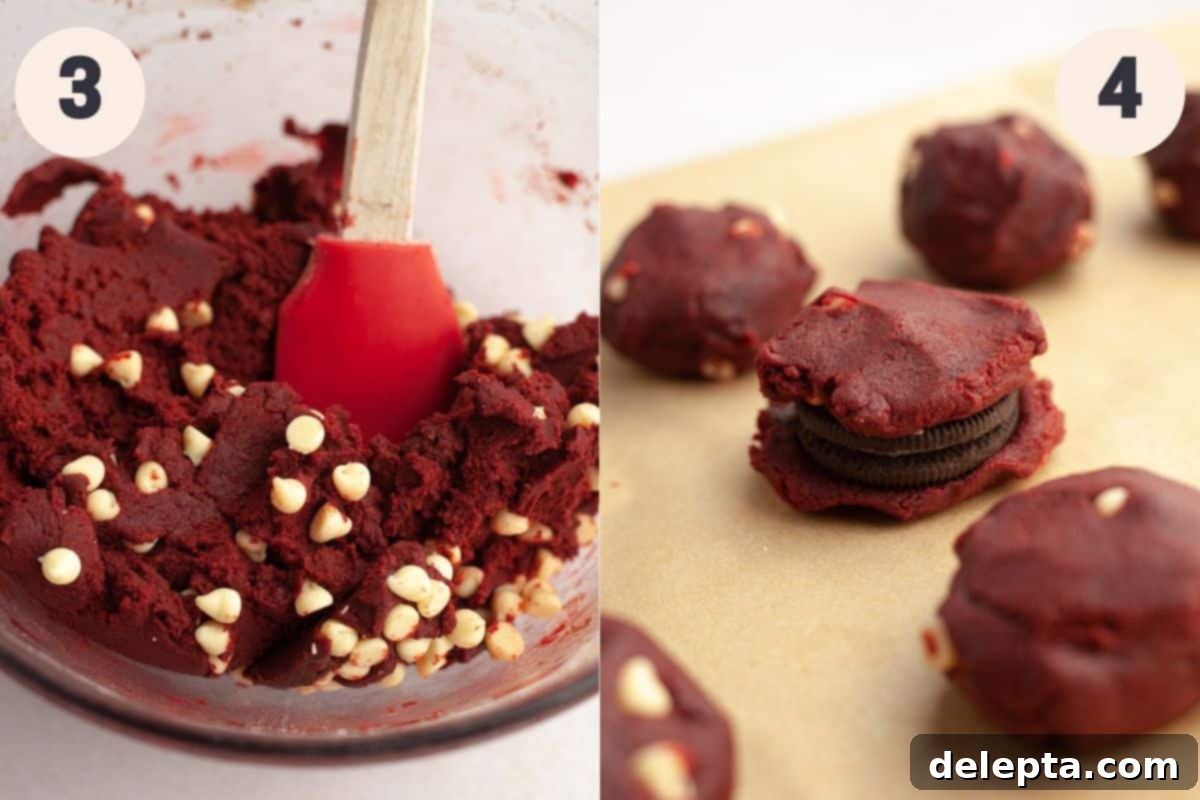
Step 3: Add Dry Ingredients, Color, and Chocolate. Pour all of your pre-measured dry ingredients directly into the bowl with the wet mixture: the all-purpose flour, natural cocoa powder, baking soda, and kosher salt. Begin beating on low speed until just combined. At first, the dough will appear quite dry and crumbly, but be patient – it will eventually come together to form a cohesive dough. Avoid overmixing, as this can lead to tough cookies. If, after about a minute of mixing, your dough still seems excessively dry and isn’t forming, you may carefully add up to ½ tablespoon of milk, one tiny splash at a time, until the desired consistency is reached. Next, add your chosen red food gel. The exact amount will depend entirely on the brand and intensity of your food gel, so start with a small amount and mix until the dough achieves your preferred vibrant red shade. Finally, gently fold in about ½ cup of your white chocolate chips until they are evenly distributed throughout the red velvet dough.
Step 4: Prepare and Stuff the Cookie Dough. Line a baking sheet with parchment paper to prevent sticking and ensure even baking. Using a standard tablespoon or a small cookie scoop, portion out one tablespoon of the red velvet cookie dough. Gently flatten this ball of dough in the palm of your hand. Place one whole Oreo cookie directly on top of the flattened dough. Scoop out another tablespoon of dough and carefully place it on top of the Oreo. Now, use your fingers to meticulously form and seal the dough around the Oreo cookie, ensuring it is completely covered and no Oreo peeks through. Aim for a smooth, uniform ball. Place the stuffed cookie dough ball onto the prepared baking sheet and repeat this process with the remaining dough until all your Oreos are encased in delicious red velvet. Leave a bit of space between each dough ball.
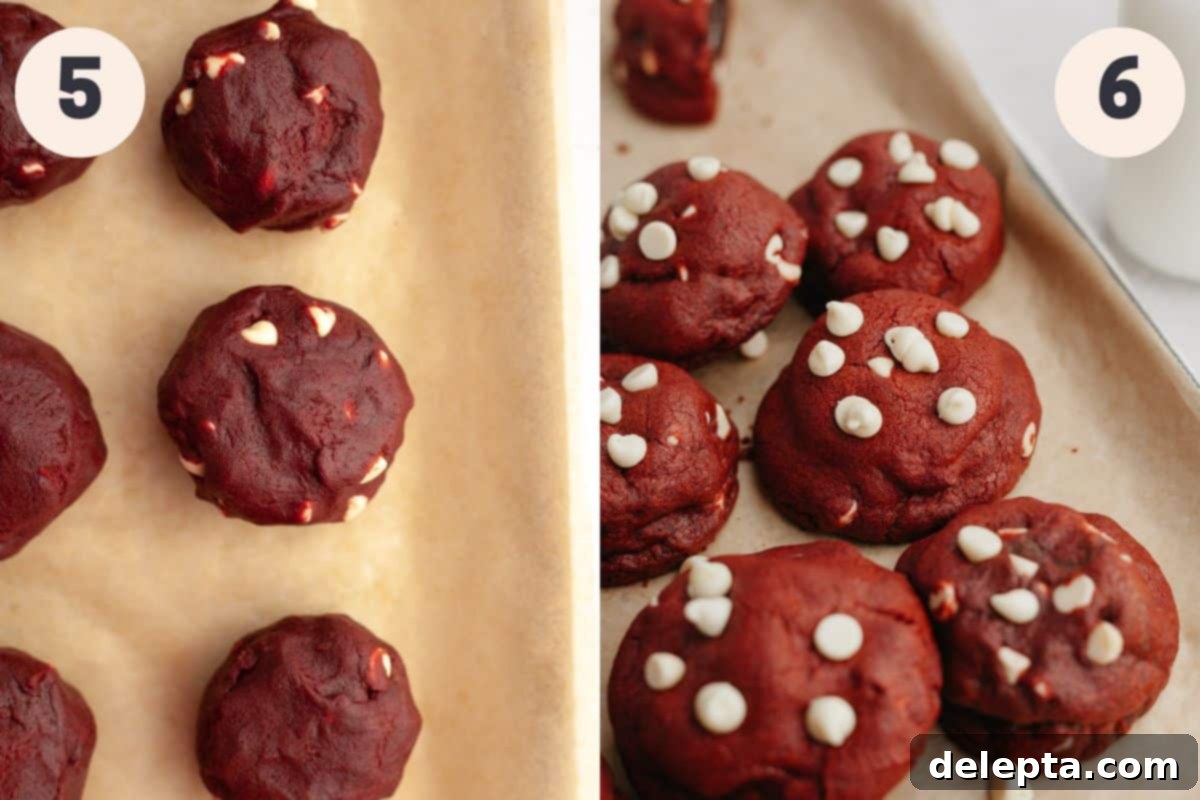
Step 5: Chill the Dough (Don’t Skip This!). This step is essential for perfectly thick, chewy cookies. Place the baking sheet with the formed cookie dough balls into the refrigerator and chill for approximately 2 hours. While you *can* technically skip this step, be aware that the cookies will spread significantly more during baking, resulting in thinner, flatter cookies. Chilling the dough helps the butter solidify, preventing excessive spread and allowing the flavors to meld beautifully.
Step 6: Bake and Finish. Preheat your oven to 350°Fahrenheit (175°Celsius). Arrange no more than 7 cookie dough balls at a time on your parchment-lined baking sheet, ensuring you leave a few inches of space between each cookie to allow for proper spreading. Bake for 9-11 minutes. The cookies are done when the edges are set and slightly golden, but the centers still look soft and slightly underdone. As soon as the cookies emerge from the oven, gently press the remaining white chocolate chips onto the tops of each warm cookie. This creates that desirable “bakery-style” appearance with visible, perfectly melted chocolate. Allow them to cool on the baking sheet for a few minutes before transferring to a wire rack to cool completely. Then, enjoy your magnificent Red Velvet Oreo Cookies!

Expert Baking Tips & Tricks for Bakery-Quality Red Velvet Oreo Cookies
- Accurate Measuring for Success: Precision is paramount in baking. We highly recommend using a digital kitchen scale and measuring all your ingredients, especially flour, using the metric system (grams). This is the most accurate way to bake and significantly reduces the chance of ending up with dry or dense cookies. Small inaccuracies with cup measurements can drastically alter the final texture.
- The “Fluff and Sprinkle” Method for Flour: If you absolutely must use measuring cups instead of a scale, it’s crucial to measure your flour correctly to avoid adding too much. Never scoop flour directly from the bag. Instead, first fluff the flour in its container with a spoon or whisk. Then, lightly sprinkle the flour into your measuring cup until it’s overflowing. Finally, use the back of a straight knife or other flat edge to level off the excess flour. This prevents compacting the flour, which can add up to 20-30% more flour than intended, leading to dry, crumbly cookies instead of soft and chewy ones. For a visual guide, you can find more details on this technique here.
- Perfectly Placed White Chocolate Chips: To achieve that appealing, professional “bakery style” look with visible, slightly melted chocolate chunks on top, we recommend adding some of your white chocolate chips *after* baking. As soon as the cookies come out of the oven, while they are still warm and pliable, lightly press your reserved extra white chocolate chips onto the tops of each cookie. This method prevents the white chocolate from burning or over-browning in the oven, ensuring a pristine finish and creamy texture.
- The Importance of Chilling the Dough: While it might be tempting to skip this step in your eagerness to enjoy these cookies, we strongly advise against it for the best results. We’ve tested this recipe without chilling, and the cookies do spread considerably, resulting in a much thinner texture. Chilling the cookie dough for at least 2 hours allows the butter to firm up, preventing the cookies from spreading too rapidly in the oven. It also gives the flour time to fully hydrate, leading to a chewier texture and a more concentrated, richer flavor. If you’re truly short on time, you can bake them without chilling, but anticipate a thinner, less robust cookie.
- Room Temperature Ingredients are Key: Ensure your butter and egg are at proper room temperature. This allows them to cream together effectively, forming an emulsified mixture that traps air and contributes to a light, uniform dough. Cold ingredients won’t mix as smoothly and can result in a lumpy batter.
- Don’t Overbake: For soft and chewy cookies, it’s better to slightly underbake than overbake. The cookies may appear slightly undone in the center when you pull them out of the oven, but they will continue to set as they cool on the hot baking sheet. Look for edges that are just set and a center that is still slightly puffy.
Frequently Asked Questions About Red Velvet Oreo Cookies
For those coveted perfectly round, bakery-style cookies, here’s a neat trick: as soon as your cookies are out of the oven and still hot, use a large round cookie cutter (or even the rim of a large mug) that is slightly larger than your cookie. Place it around each warm cookie and gently scoot the cookie inside, rotating the cutter in a circular motion. This smooths out any uneven edges and creates a beautiful, uniform round shape.
While you *can* bake these red velvet Oreo cookies without chilling if you’re in a hurry to satisfy your cookie craving, please be aware of the consequences. Unchilled dough will spread much more during baking, resulting in thinner, flatter cookies. For the best texture – thick, chewy, and rich – and to ensure the Oreos remain perfectly encased, chilling the dough for at least 2 hours is highly recommended.
I used Americolor food gel in the vibrant shade ‘Super Red’. Americolor is known for its highly concentrated colors, meaning a little goes a long way. Keep in mind that different brands of food gel will have varying color intensities. My best advice is to add the food gel gradually, a few drops at a time, mixing thoroughly after each addition until you achieve your desired deep, rich red color. It’s much easier to add more color than to remove it!
No, we strongly advise against using Dutch-processed cocoa powder for this recipe. Our recipe relies on natural or unsweetened cocoa powder, which is acidic, to react with the baking soda (an alkaline leavener). This reaction creates the necessary carbon dioxide bubbles that give the cookies their lift and tender texture. Dutch-processed cocoa has been treated to neutralize its acidity and will not react properly with baking soda, potentially leading to flat, dense, and less flavorful cookies. Always double-check your cocoa powder label to ensure it’s natural or unsweetened.
Don’t panic! When you first combine the dry ingredients with the wet mixture, it can initially appear quite dry, sandy, or crumbly. This is often normal and it takes a moment for the liquids to fully hydrate the flour and cocoa. Continue mixing on low speed, patiently allowing the dough to come together. However, if after a minute or two of mixing, your cookie dough truly remains excessively dry, sandy, and stubbornly crumbly (which can sometimes happen depending on the specific brand of flour and cocoa powder you’re using), you can add up to ½ tablespoon of milk. Add it very sparingly, a teaspoon at a time, and mix briefly after each addition until the dough just comes together. If you do add milk, please note that it will make the dough slightly stickier, so it becomes even more crucial to chill the cookie dough for the full 2 hours before baking to prevent spreading. Use this as a last resort, prioritizing patience first!
Absolutely! These cookies are perfect for making ahead. For raw dough, form the stuffed cookie dough balls as directed, then freeze them on a parchment-lined baking sheet until solid. Once frozen, transfer them to an airtight freezer-safe bag or container for up to 2 months. When ready to bake, you can bake them directly from frozen (no need to thaw), adding an extra 2-4 minutes to the baking time. For baked cookies, store them in an airtight container at room temperature for up to 1 week, or freeze for up to 1 month. Thaw at room temperature or gently reheat for a fresh-baked experience.
Using a cookie scoop (rather than just a tablespoon) is the easiest and most consistent way to portion out your cookie dough, ensuring all your cookies are the same size and bake evenly. For these stuffed Oreos, a 2-tablespoon scoop (often labeled as a #30 or #40 scoop) works perfectly to provide enough dough to fully encase the Oreo.
Explore More Delicious Cookie Recipes!
If you loved these Red Velvet Oreo Cookies, then you’re in for a treat with our other fan-favorite cookie recipes. Each one is designed for ease and maximum flavor, ensuring your baking adventures are always a success. From classic comforting flavors to unique twists, there’s a perfect cookie waiting for every occasion and every craving!
- Small Batch Oatmeal Chocolate Chip Cookies
- Soft and Chewy Mini M&M Cookies
- Easy M&M Chocolate Chip Cookies (One Bowl)
- The Best Browned Butter Snickerdoodles
Have you made this delightful recipe? Please take a moment to rate the recipe below! We love seeing your creations! Don’t forget to follow me on Instagram @alpineella and Pinterest to share your baking journey and discover more sweet inspirations!
Recipe Card

Red Velvet Oreo Cookies
Ella Gilbert
Pin Recipe
Save RecipeSaved!
Ingredients
- ½ cup unsalted butter room temperature
- ½ cup white sugar
- ½ cup light brown sugar
- 1 large egg room temperature
- 2 teaspoons vanilla extract
- 2 cups all purpose flour
- 3 tablespoons cocoa powder natural unsweetened cocoa powder
- ¾ teaspoon baking soda
- ½ teaspoon kosher salt
- red food gel
- 14 Oreos
- ¾ cup white chocolate chips divided
Instructions
-
Begin by preparing your baking surface: line a large baking sheet with parchment paper to ensure easy removal and prevent sticking.
-
In a spacious mixing bowl, utilizing either a handheld mixer or a stand mixer equipped with the paddle attachment, combine the softened, room-temperature unsalted butter with both the white granulated sugar and the light brown sugar. Beat these ingredients together on medium-high speed for 2-3 minutes, until the mixture becomes visibly light, fluffy, and takes on a pale color. This crucial creaming step incorporates air, which is vital for the cookies’ tender texture.½ cup unsalted butter, ½ cup white sugar, ½ cup light brown sugar
-
Pause the mixer and thoroughly scrape down the sides of the bowl with a rubber spatula to ensure all ingredients are evenly incorporated. Next, add the large room-temperature egg and the vanilla extract. Beat again on medium-high speed for 1 minute until the mixture is smooth and well combined. You might need to stop and scrape the sides once more during this step to ensure everything is fully emulsified.1 large egg, 2 teaspoons vanilla extract
-
With the mixer stopped, add all the dry ingredients – the all-purpose flour, baking soda, natural unsweetened cocoa powder, and kosher salt – directly into the bowl. Mix on low speed until they are just combined. The dough may appear quite dry and crumbly at first, but be patient; it will eventually come together. Avoid overmixing, as this can develop the gluten too much, leading to tough cookies. If, after thorough mixing, the dough is exceptionally dry, sandy, and crumbly, you can add up to ½ tablespoon of milk, a tiny bit at a time, until the dough forms.2 cups all purpose flour, 3 tablespoons cocoa powder, ¾ teaspoon baking soda, ½ teaspoon kosher salt
-
Now, add your red food gel. We haven’t specified an exact amount because the intensity varies significantly between brands. Begin with a few drops, mix it in, and then add more incrementally until the cookie dough achieves your desired vibrant red shade. Once the color is perfect, gently stir in ½ cup of the white chocolate chips, ensuring they are evenly distributed throughout the dough.red food gel, ¾ cup white chocolate chips
-
Using a tablespoon or a small cookie scoop, portion out one tablespoon of the red velvet dough. Gently flatten this portion in the palm of your hand. Carefully place one whole Oreo cookie onto the center of the flattened dough. Scoop out another tablespoon of dough and place it directly on top of the Oreo. Use your fingers to skillfully work the dough around the Oreo, ensuring it is completely sealed and covered on all sides, forming a smooth, uniform ball. Place the stuffed dough ball on your prepared baking sheet and repeat this process with the remaining dough and Oreos.14 Oreos
-
Place the baking sheet with the prepared cookie dough balls into the refrigerator and chill for at least 2 hours. This chilling step is vital to prevent the cookies from spreading too much during baking, ensuring they remain thick and chewy. While the dough chills, preheat your oven to 350°Fahrenheit (175°Celsius). When ready to bake, arrange no more than 7 chilled cookie dough balls at a time on your parchment-lined baking sheet, leaving several inches between each for proper spreading. Bake for 9-11 minutes. The cookies are done when the edges are set and lightly golden, but the centers still look soft and slightly underbaked. Immediately upon removing them from the oven, gently press the remaining white chocolate chips (reserved from the ¼ cup of divided chips) onto the tops of each warm, baked cookie for that perfect bakery finish.
Recipe Notes
Food Gel: We achieved the vibrant red hue using Americolor food gel in the shade ‘Super Red’. Since the intensity of food color can vary significantly between brands, we haven’t specified an exact quantity. We advise adding a small amount at a time, mixing thoroughly after each addition, until you achieve your desired deep red shade.
Butter: For a superior creamy texture and richer flavor, we consistently use European-style butter, such as Kerry Gold, in all our recipes. The higher fat content of European butter significantly contributes to a more decadent and tender cookie.
Salt: If you don’t have kosher salt on hand, you can substitute it with fine table salt, but remember to halve the amount called for in the recipe. As a general rule, 1 teaspoon of kosher salt is equivalent to ½ teaspoon of fine salt. Please note that we specifically use Diamond Crystal Kosher Salt for testing; avoid using coarse kosher salt, as its larger crystals can make the cookies excessively salty in this recipe.
Cocoa Powder: It is imperative to use natural or unsweetened cocoa powder for this recipe, and strictly avoid Dutch-processed cocoa powder. Natural cocoa is acidic and reacts with the baking soda to create lift. If your cocoa powder label mentions “acidity regulators” or “alkali,” it is Dutch-processed and will not yield the correct results.
Dry Cookie Dough: The consistency of cookie dough can sometimes vary based on the specific brand of flour and cocoa powder used. If, after thorough mixing, your cookie dough feels unusually crumbly, sandy, and excessively dry, you may cautiously add up to ½ tablespoon of milk, a teaspoon at a time. Mix briefly after each addition until the dough just comes together. Should you add milk, please note that the dough will become slightly stickier, making the 2-hour chilling period before baking even more critical to prevent unwanted spreading.
White Chocolate Chips (Post-Bake Application): Typically, we recommend placing some chocolate chips on top of cookie dough balls before baking to achieve that appealing “bakery look.” However, white chocolate chips are prone to burning or over-browning in the oven due to their sugar content. Therefore, for this recipe, we advise reserving a small portion of white chocolate chips and gently pressing them onto the freshly baked, warm cookies immediately after they come out of the oven. This method ensures they melt beautifully and retain their pristine color and creamy texture.
Storage & Freezing: Once baked, store these delightful cookies in an airtight container at room temperature for up to 1 week to maintain their freshness and chewiness. For future indulgence, you can freeze unbaked cookie dough balls for up to 2 months. To bake from frozen, simply place them on a parchment-lined baking sheet and bake at the same temperature, but extend the baking time by an extra minute or two until golden at the edges and set.
Nutrition Information
